
Last Updated October 19th, 2023 at 03:46 pm by Lisa
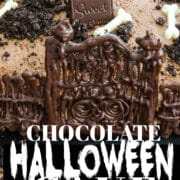
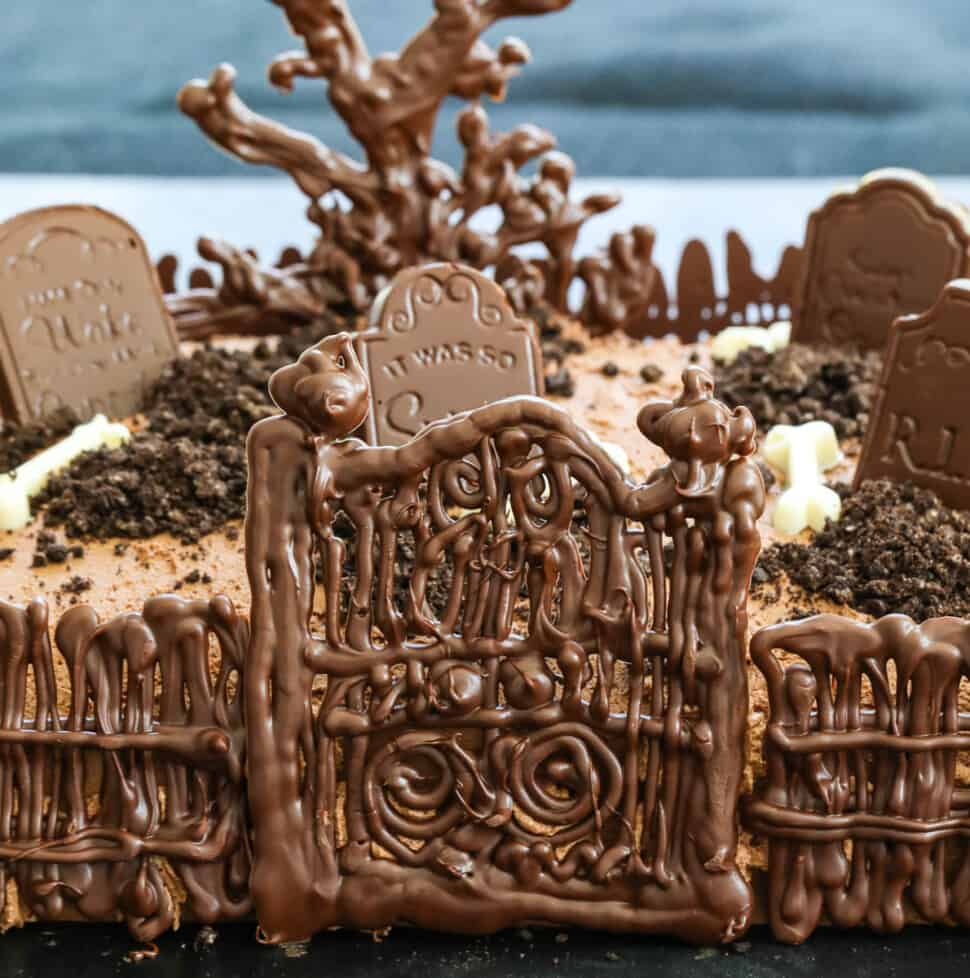
Bake a spooky Halloween Cake with orange and chocolate marbled cake inside, decorated with chocolate frosting, and a cemetery all made in chocolate! And be sure to download my free design template for edible cake decorations and take your Halloween cake recipes to the next level!
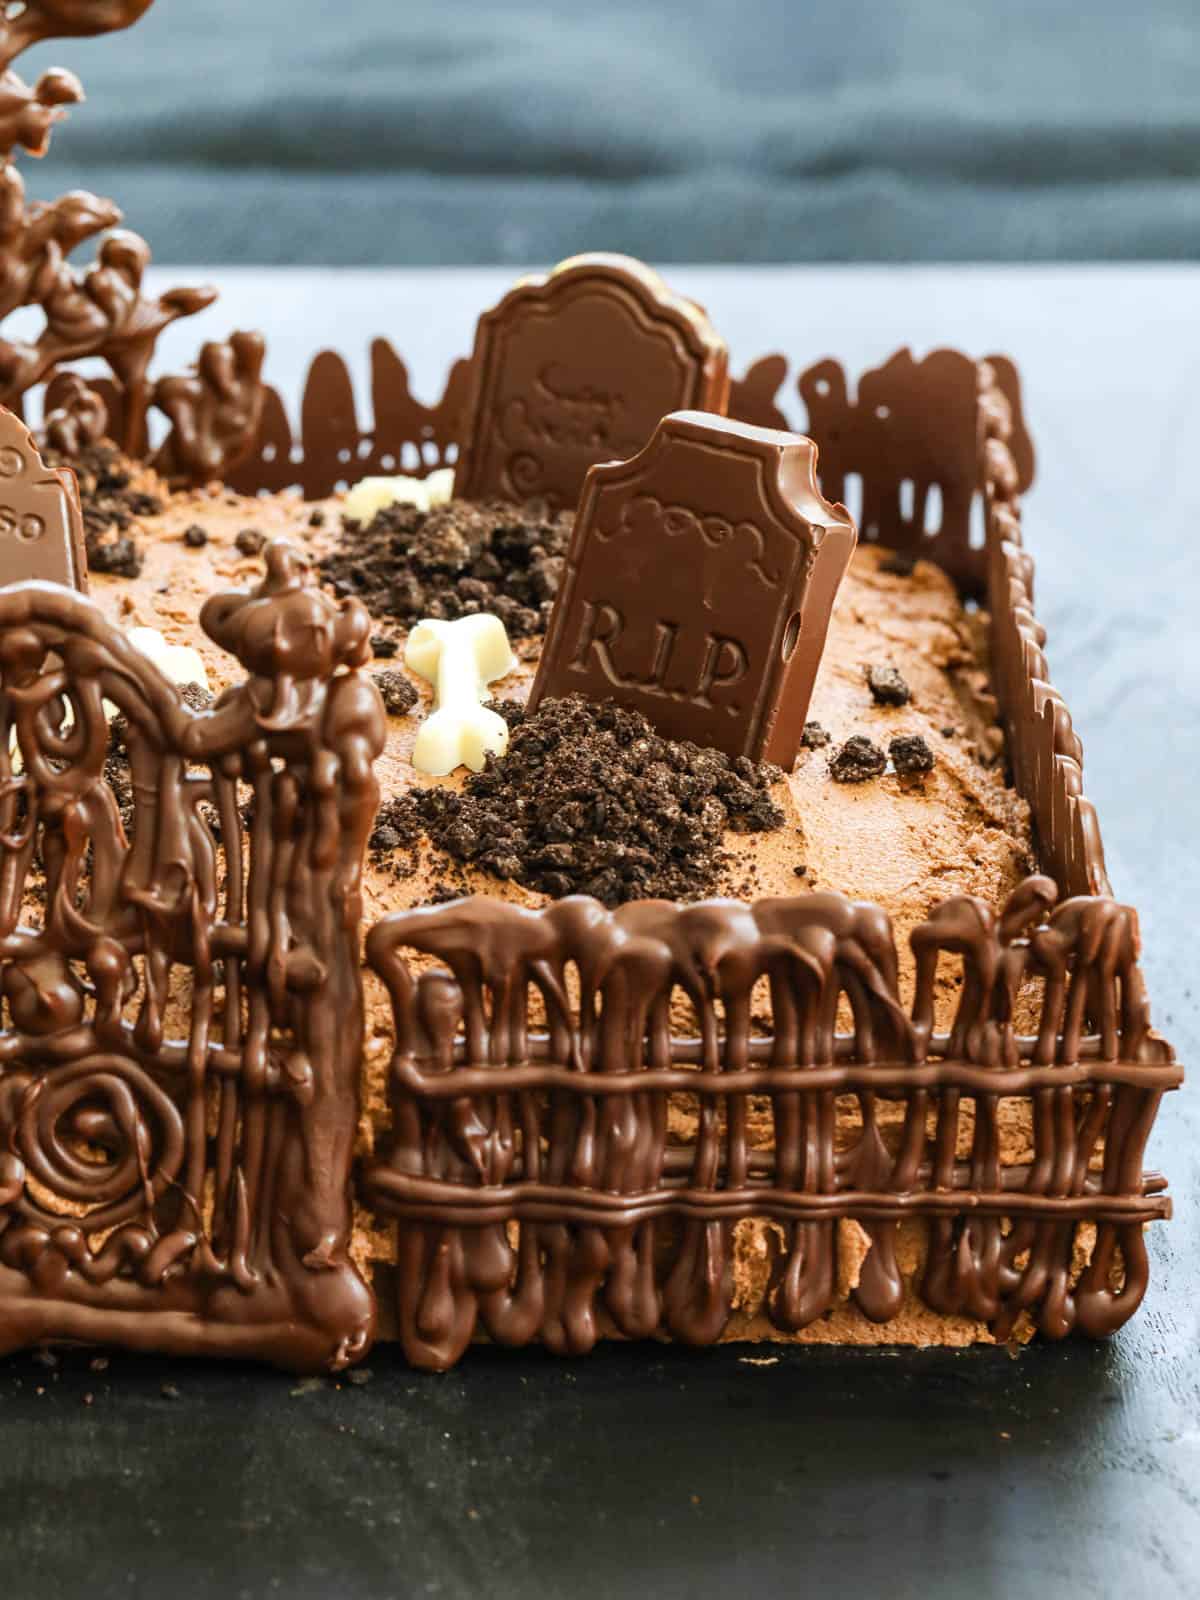
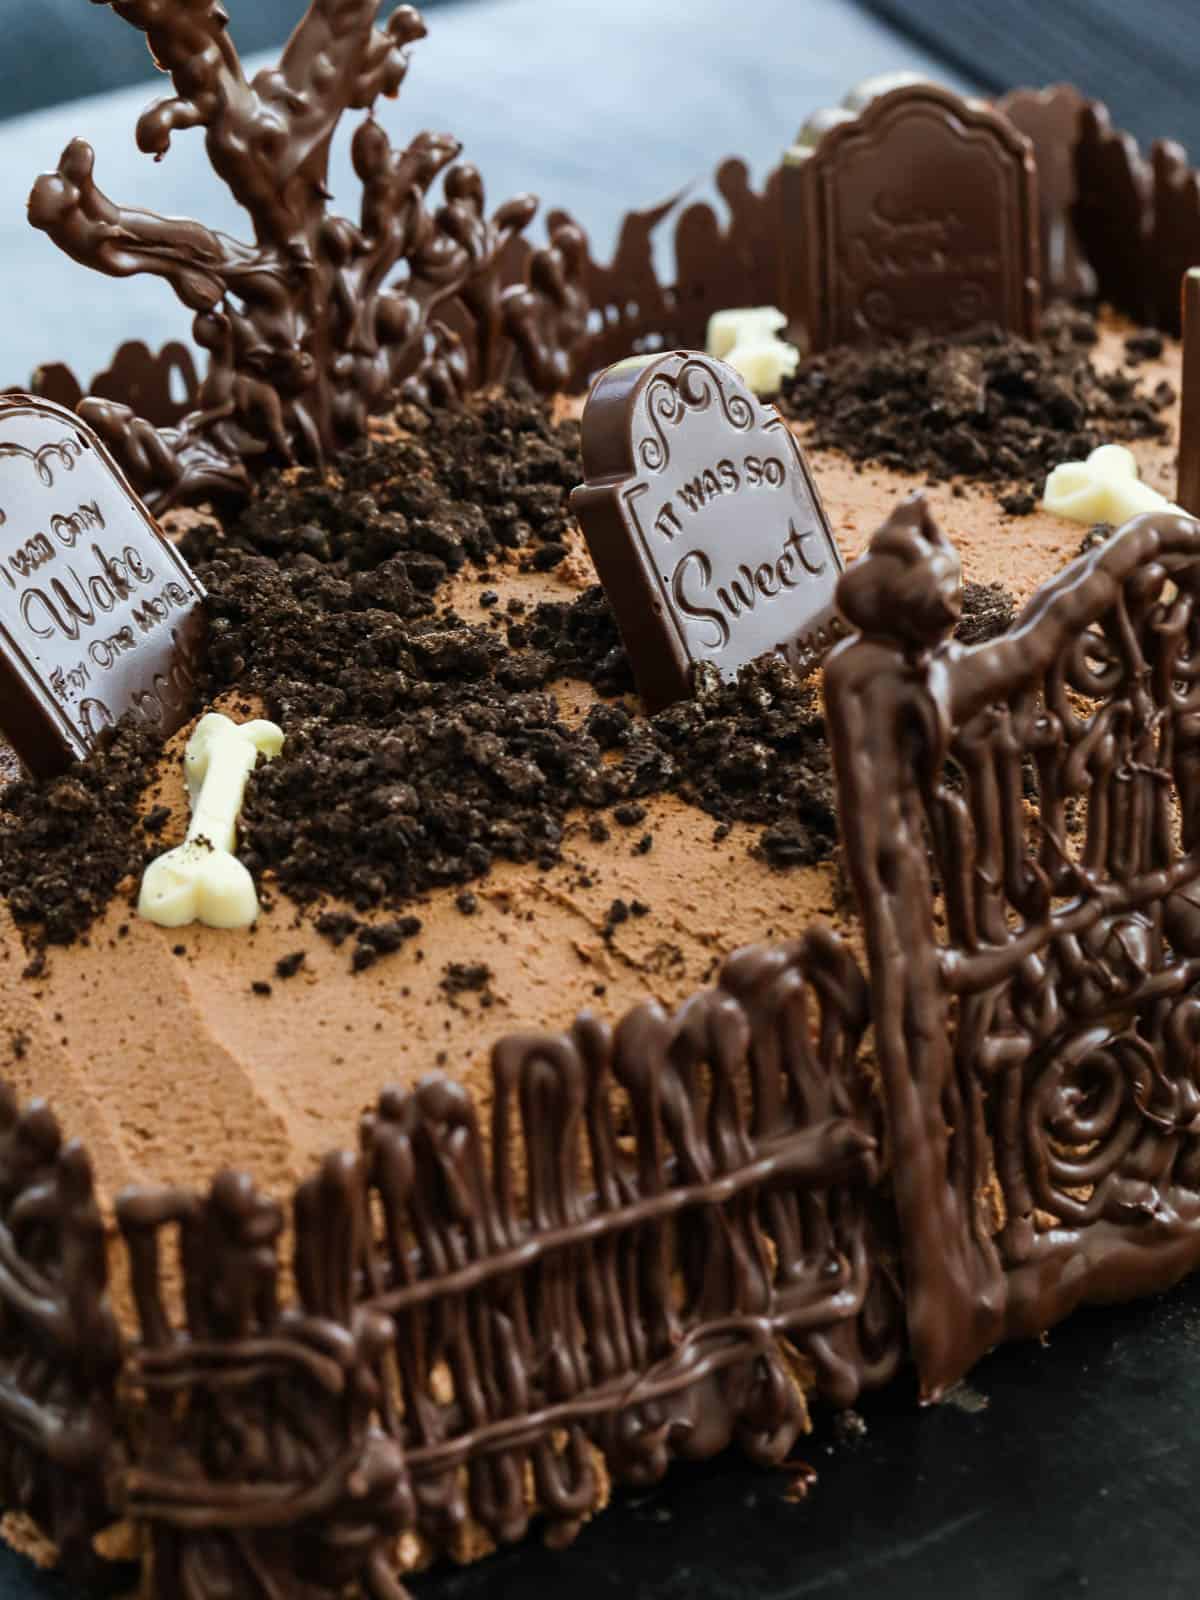
The fence, gate, tree, tombstones, "dirt" and bones will be enchanting for your family or party guests...Happy Halloween!
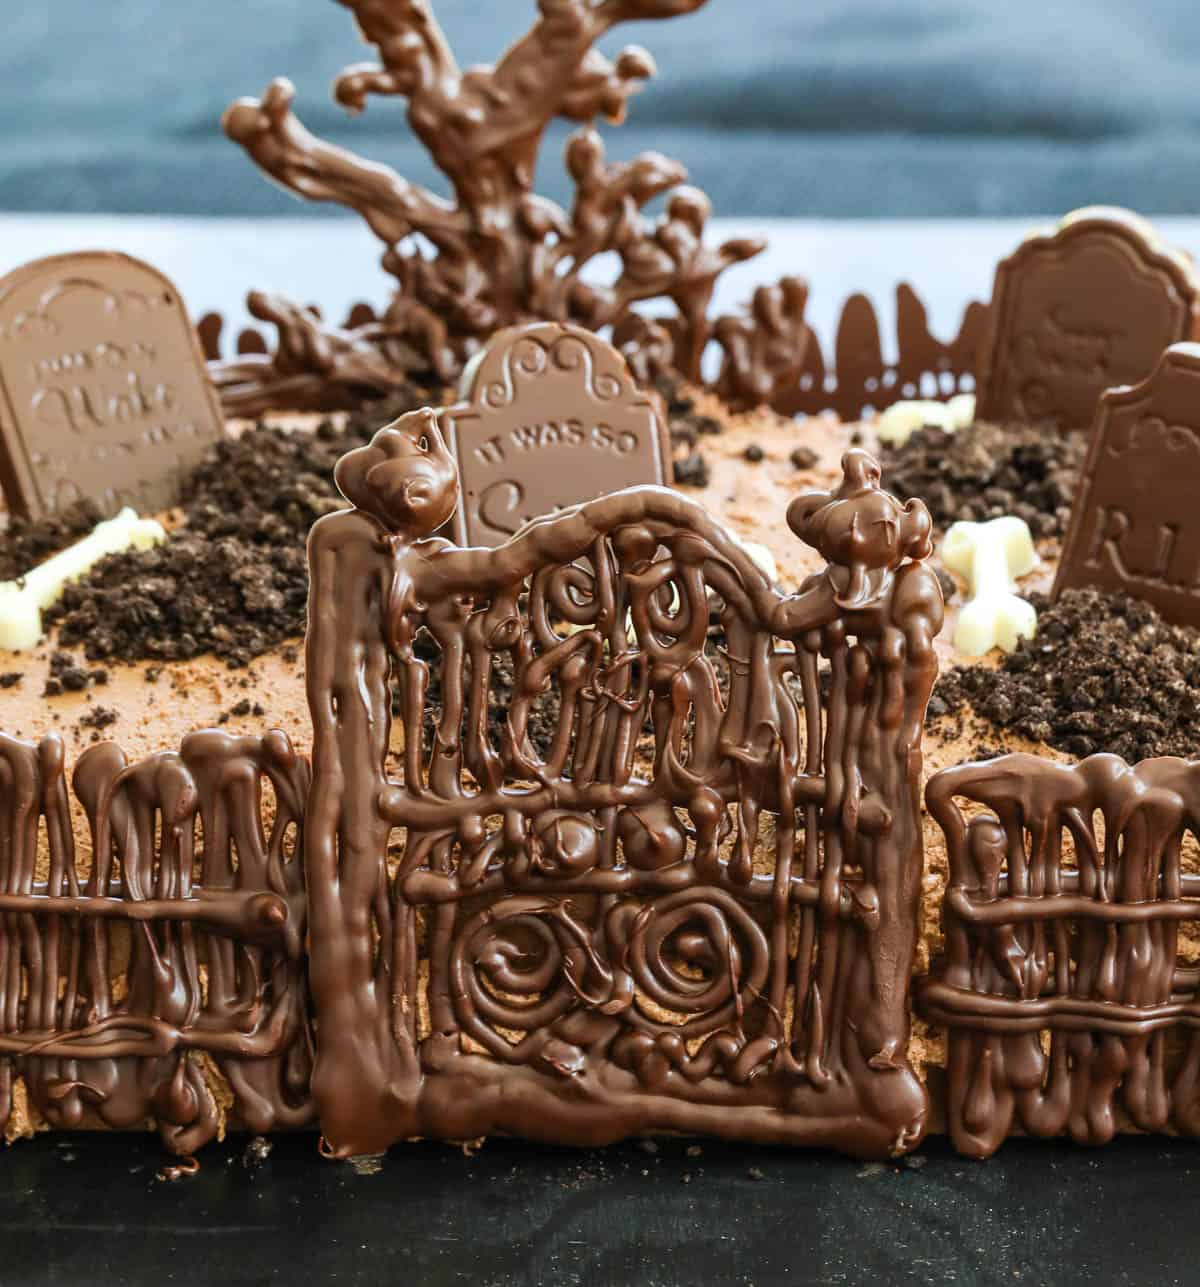
Table of Contents
Halloween Cake Recipe
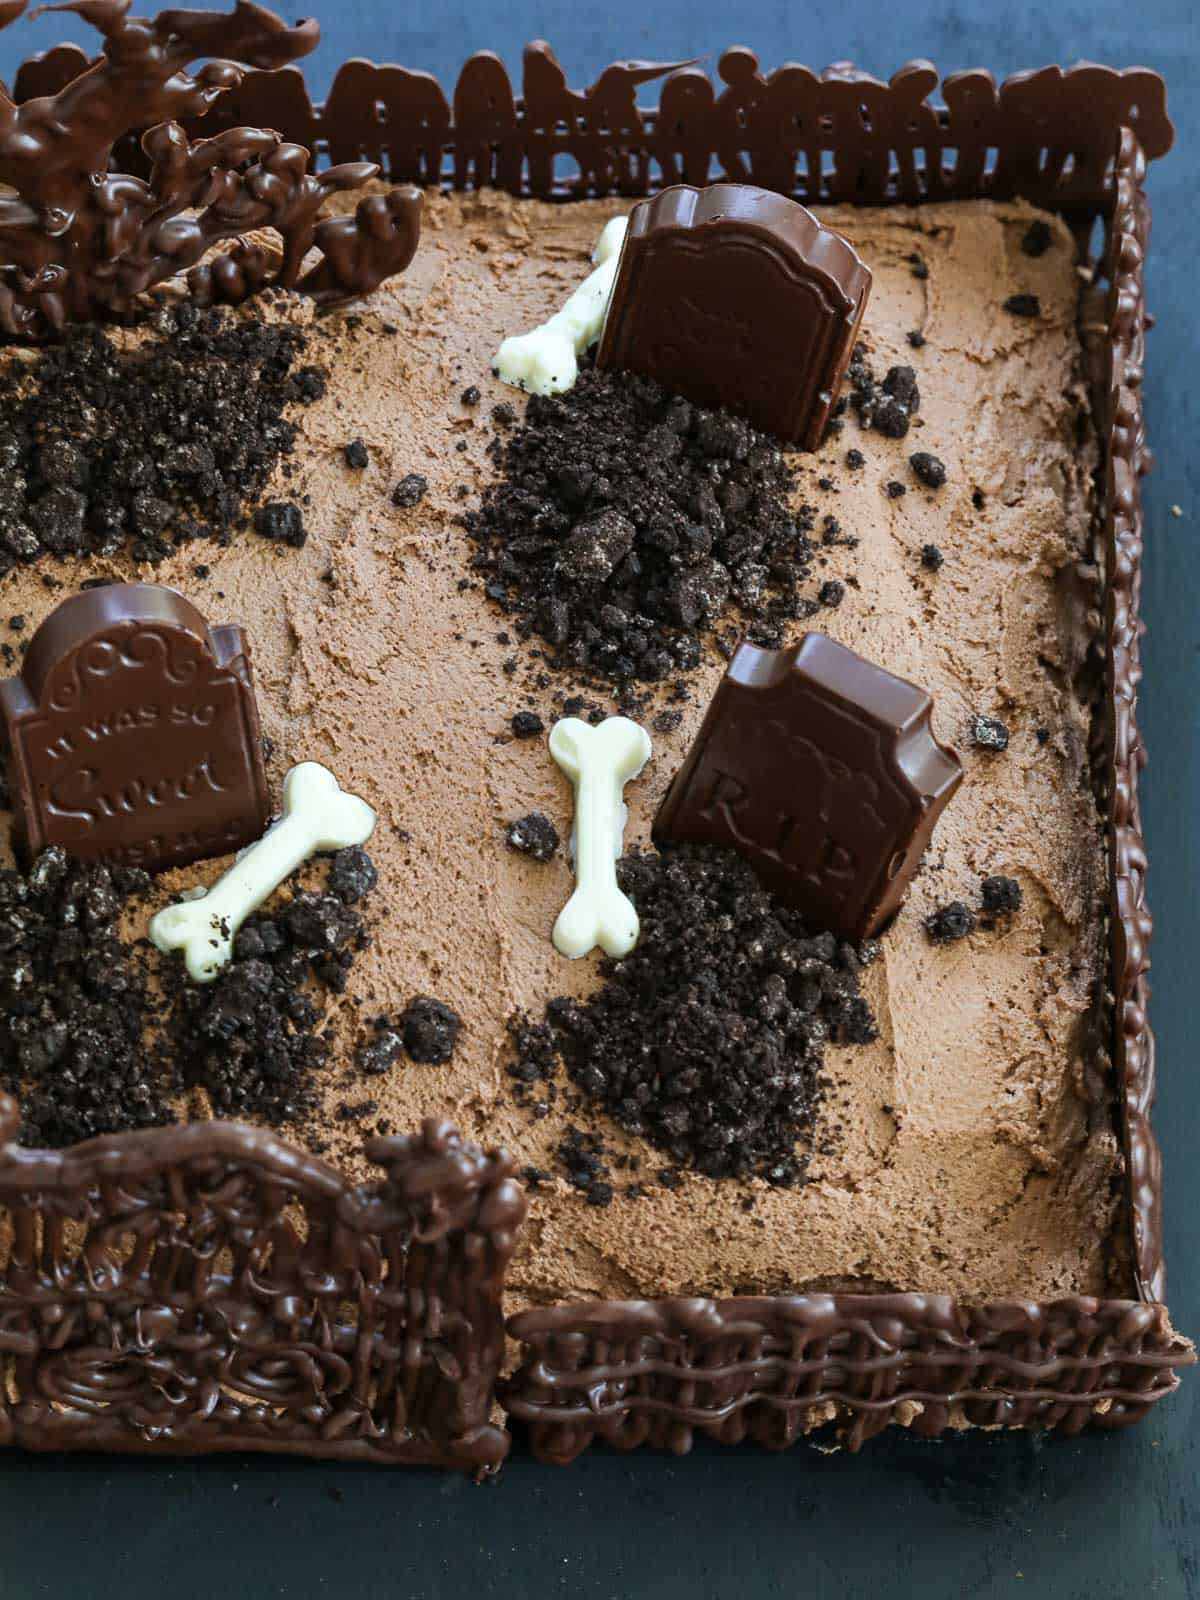
The chocolate tombstones each have whimsical funny engravings! And the little white bones and headstones are both made in a Wilton candy mold, one of my favorite new products for Halloween desserts.
The "dirt" is crushed Oreos on this delicious dessert...
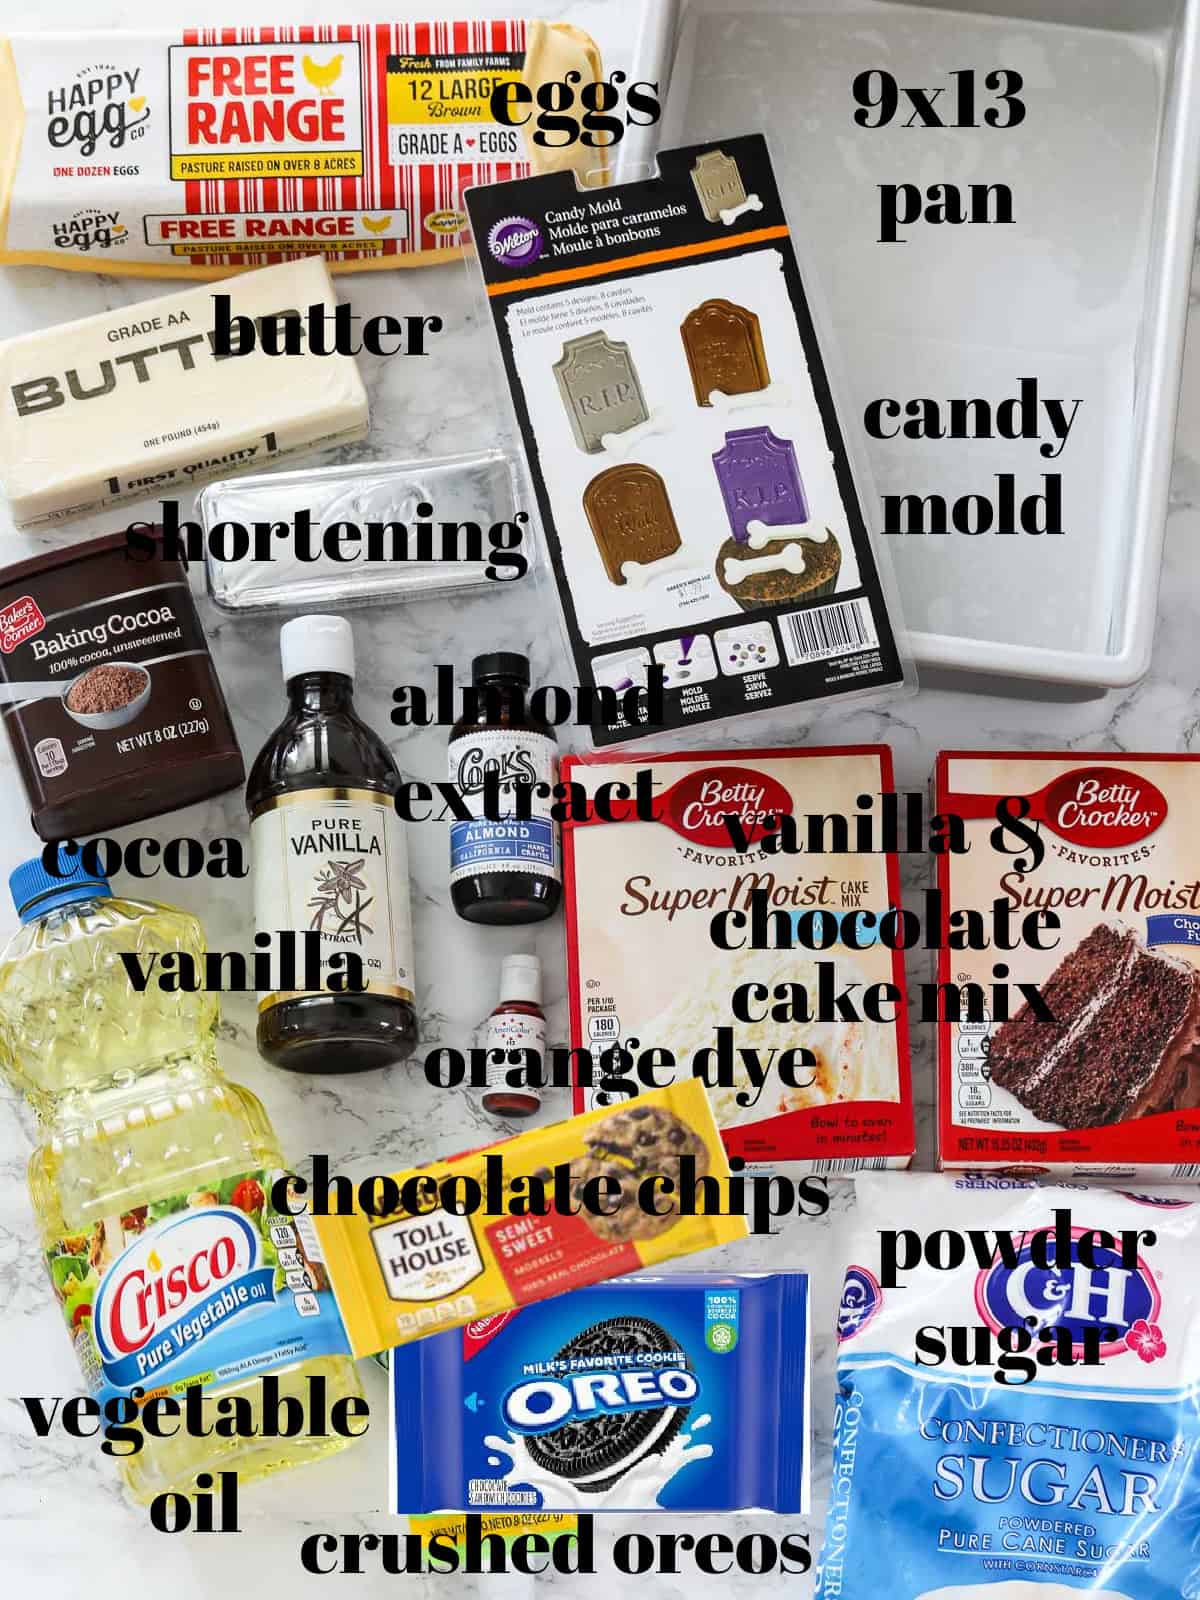
You will need a large rectangle cake pan, a 9 X 13 rectangle pan will work best to show off the chocolate cake decorations.
Chocolate Sheet Cake Ingredients
- chocolate cake mix
- white cake mix
- eggs (eggs called for on the box)
- vegetable oil (vegetable oil called for on the box)
- water (water called for on the box)
- orange food color or gel
Chocolate Cake Frosting Ingredients
- salted butter - room temperature (4 sticks)
- vegetable shortening
- powdered sugar (confectioner sugar)
- unsweetened cocoa powder
- hot water
- Vanilla Extract make it homemade, try my recipe!
- almond extract (optional but great!)
Edible Cemetary Decorations
- semi sweet chocolate chips
- vegetable oil
- white candy melts
- Oreo cookies
Bake The Halloween Cake
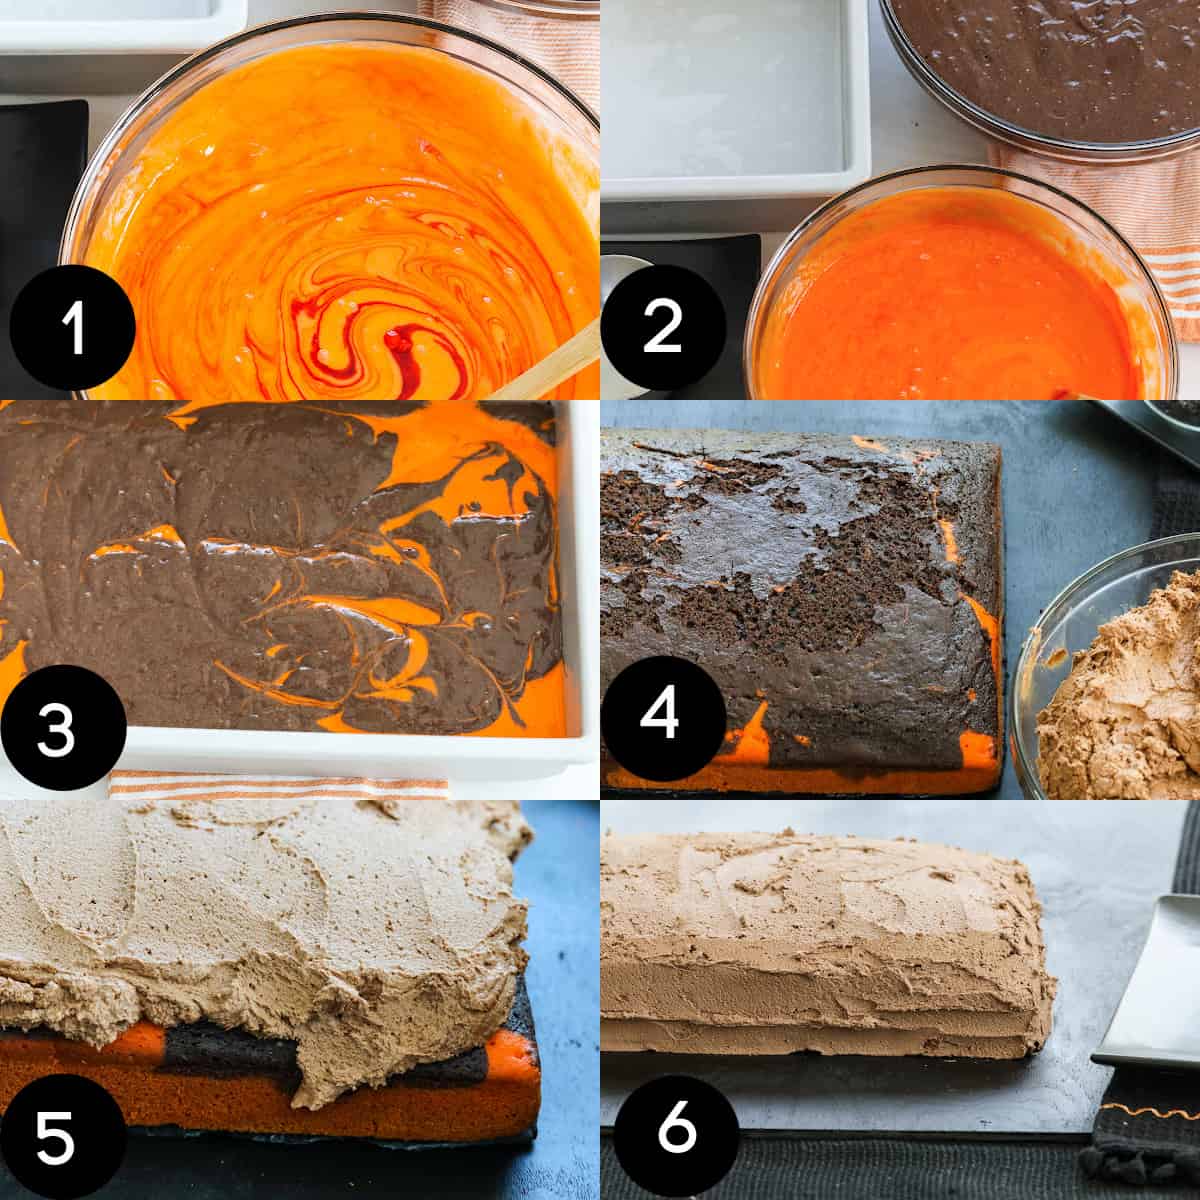
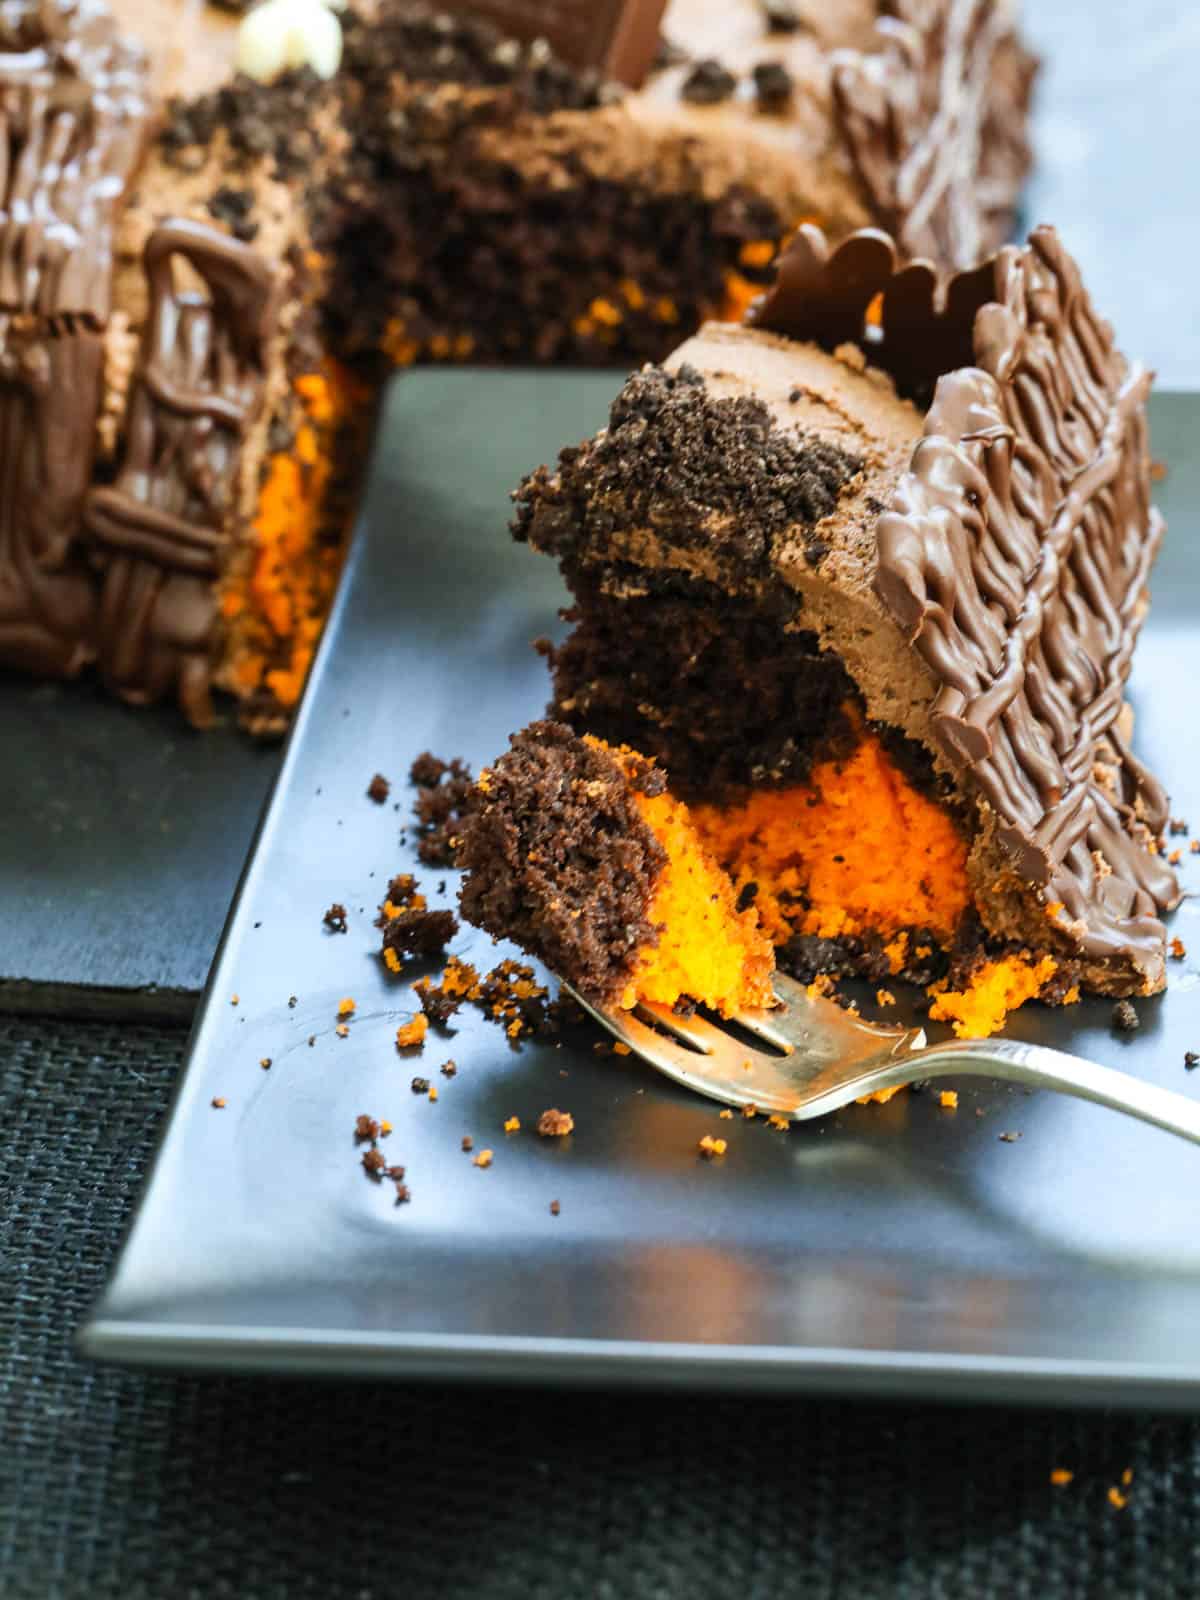
- Mix your white cake batter in a separate bowl, and stir in orange food color until it's the color your like.
- Mix your chocolate cake batter in a large mixing bowl or stand mixer according to the box directions. Deeper pans might need more batter. I used a deeper pan 3 inches deep. Most pans are 2 inches deep so I mixed up 2 boxes of cake batter.
- Spray the bottom of your cake pan with a non-stick. Next, line with parchment paper cut to fit the bottom of the pan. This will help release the cake from the pan and makes cleaning up much easier. Pour dollops of the chocolate batter into the pan alternating chocolate and orange. Try to place the batter on top of each area, it will begin to spread out. When all the batter is in the pan, use a skewer to pull lines from the center outward. Then do some slight swirls around the pan. This helps create the marble design.
- Rap the pan down on the counter to help level the batter. It pops any bubbles in the batter that would make cakes bake uneven. Bake according to your box directions. Most classic mixes require a 350-degree oven for 28 minutes for a regular 9x13 pan. Note: If you use a pan deeper than 2 inches, reduce baking temperature to 325 degrees and bake longer for 55 minutes. Check with a toothpick, if it comes out clean your cake is done.
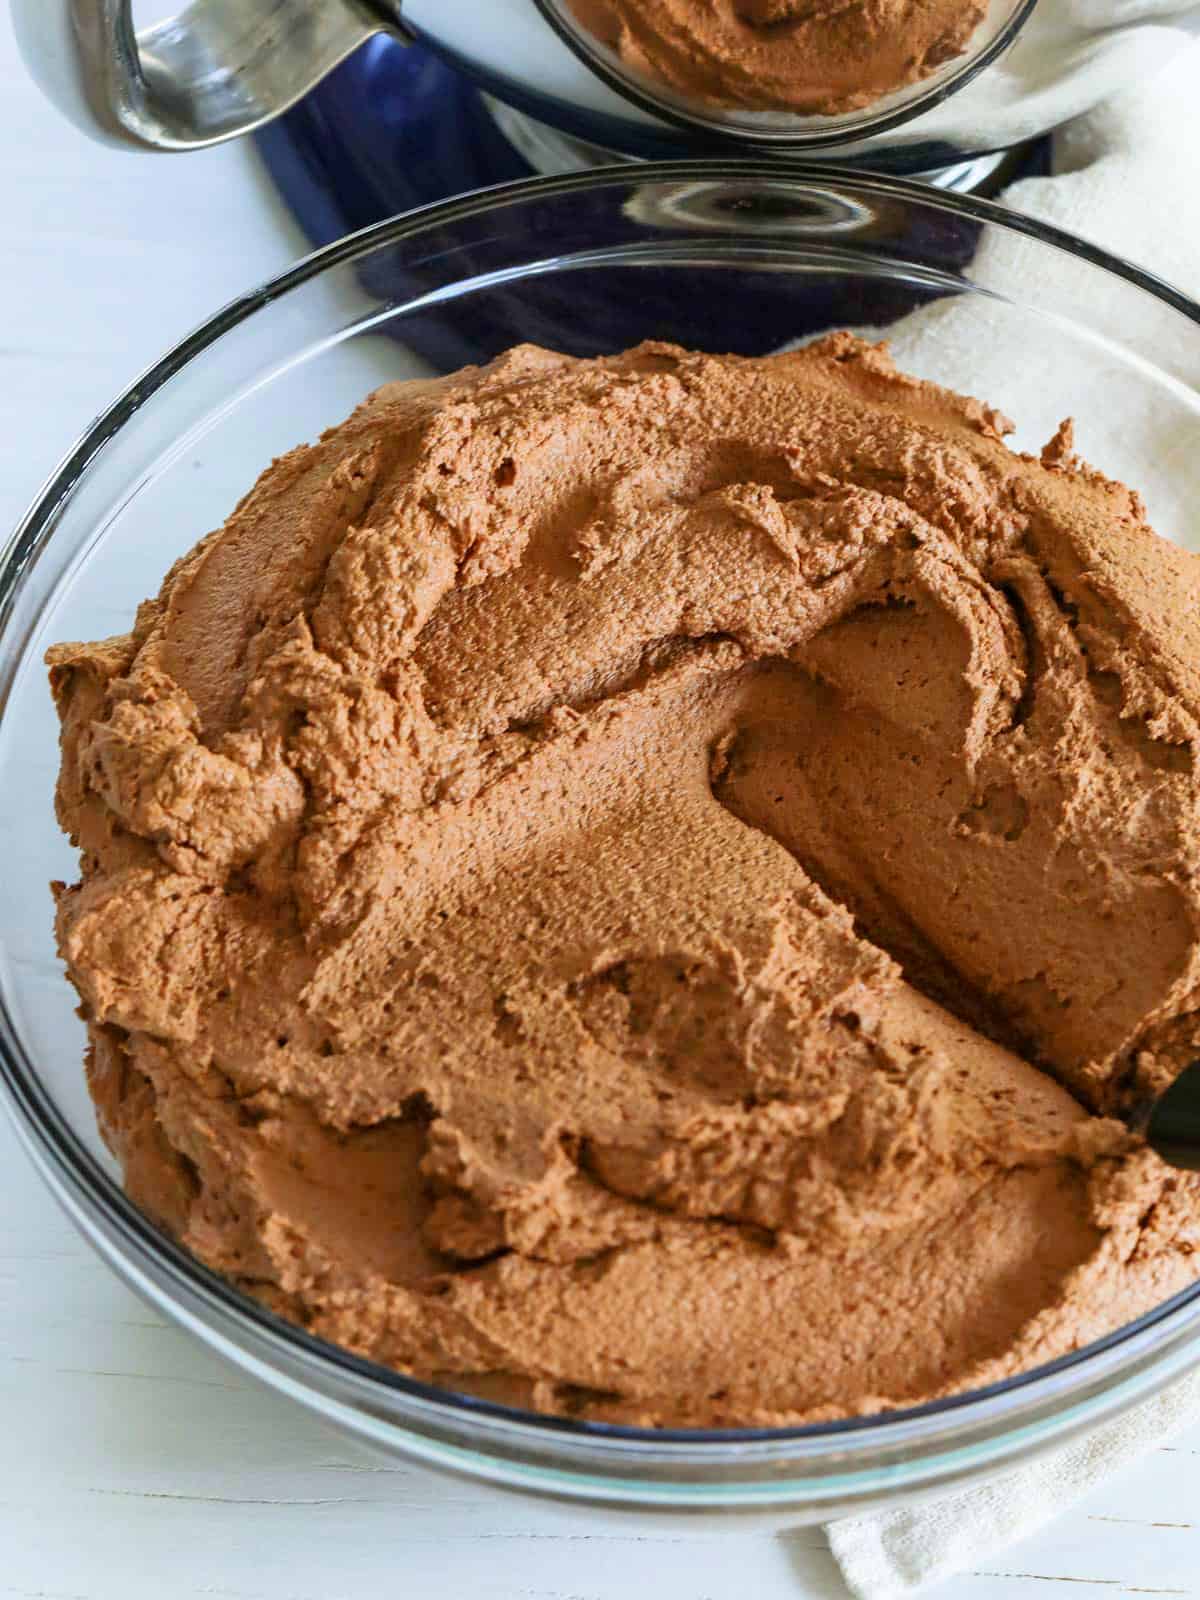
Make Chocolate Buttercream Frosting
- Beat soft butter and shortening in a mixer on high until creamy for 5 minutes.
- At low speed, add 10 cups of powdered sugar 1 cup at a time until smooth.
- Add 1 cup cocoa powder, and mix well.
- On high speed, mix in vanilla, almond extract, and hot water for 5 minutes until fluffy and smooth. Add more hot water if necessary until frosting is smooth.
PRO TIP: Frost cakes with a small offset spatula. It makes it really easy, but a butter knife will work too.
Graveyard Cake Baking Tips
Cake Pans - You can bake this in a sheet pan, glass 9 x 13 dish, or metal pan. For pans deeper than 3 inches, you will want to lower the temperature from 350 down to 325 degrees. Also, bake it longer for about 50 minutes. Also, be sure to line the pan with parchment. It makes taking the cake out so much easier and in one piece. 🍰
Batter - Coloring the batter is really easy. Be sure to use a bowl that won't stain with the orange dye. Place big dollops of batter on top of each other. Then use a chopstick to pull outward from the center and then in a circle. This makes the swirls you want in marbled cake! 🥣
Baking - You can bake a day ahead. Keep it chilled in the fridge until it's time to decorate. You will want it very cool before you frost it!
PRO TIP: Chill the cake in the refrigerator for at least two hours or preferably overnight before decorating. This gives you time to create your chocolate work decorations. Bake one day, then decorate the next, this helps release steam and the frosting holds on better when chilled.
PRO TIP: Place a dollop of frosting on a small piece of cardboard (cut to fit the cake) on a tray or a cutting board. This keeps it from sliding around while decorating and makes it easy to move to the fridge and serve.
Edible Halloween Cake Decorations
Tombstones/Bones - I used a Tombstone Candy Mold above ⬆️ from Wilton. It is really easy to make bones and tombstones with melted chocolate chips and a little vegetable oil for the tombstones, and white candy melts for the bones.
Dirt - Crush Oreo cookies in a small plastic zip-top bag, and sprinkle it around tombstones and trees.
Design Template - Download the free design template for Halloween Chocolate Work
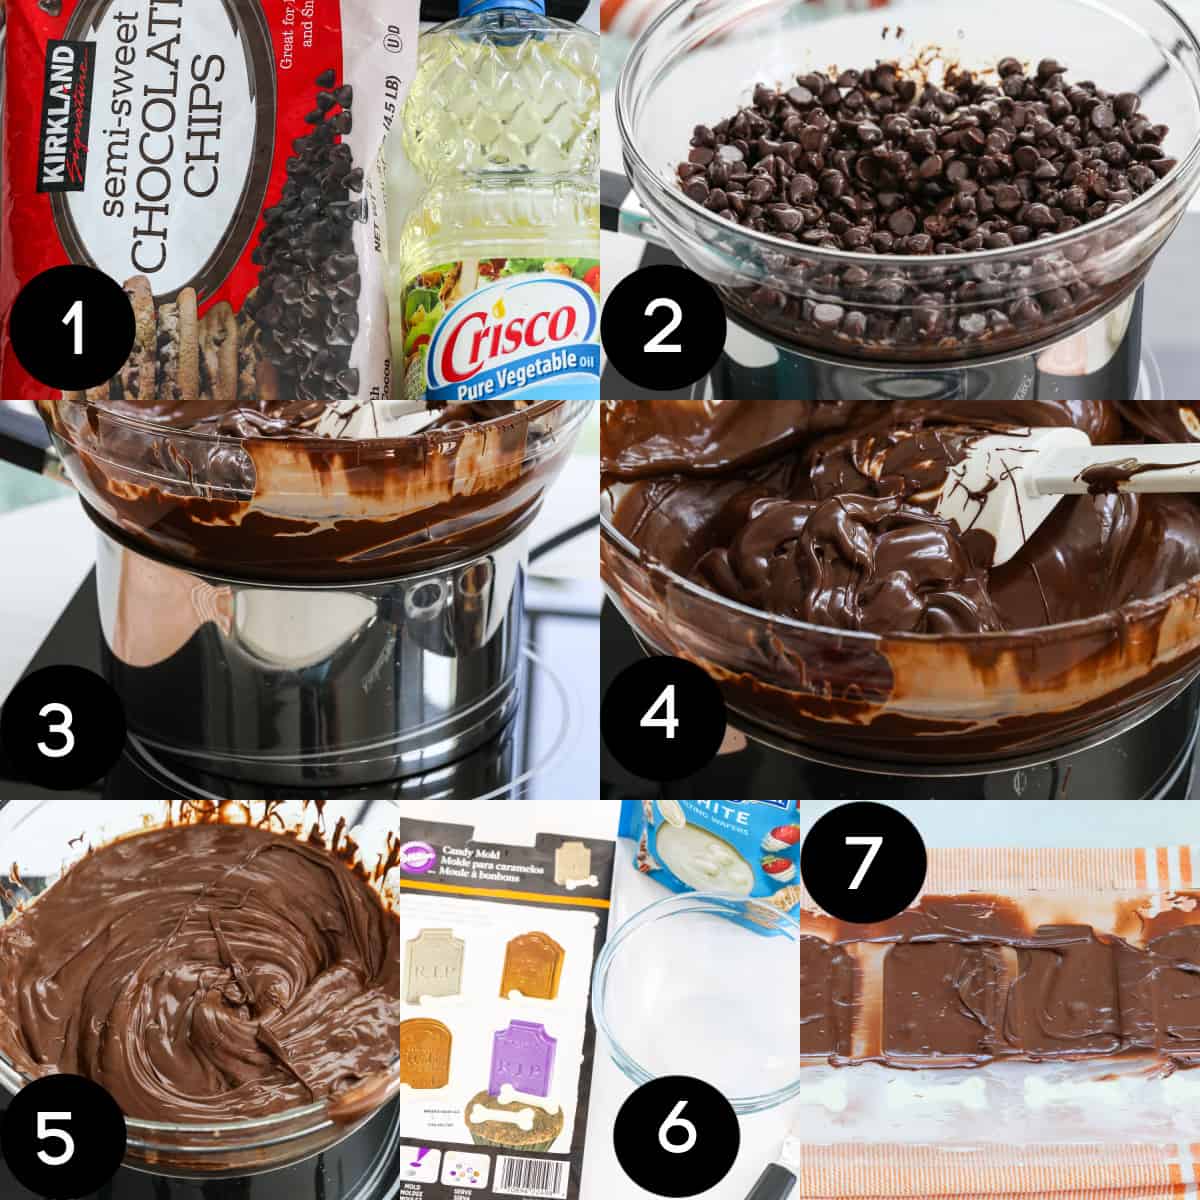
- In a double boiler, add 24 ounces of semi sweet chocolate chips and a teaspoon of vegetable oil.
- Stir until melted over simmering not boiling water.
- IMPORTANT: don't splash water into the melting chocolate, or it might seize.
- You might need to add a tiny bit more vegetable oil to get it smooth.
- Use a candy mold and fill the tombstones with melted chocolate.
- I used white candy melts (melt in the microwave) for the bones, and chocolate chips for the tombstones. Chill in the fridge to set.
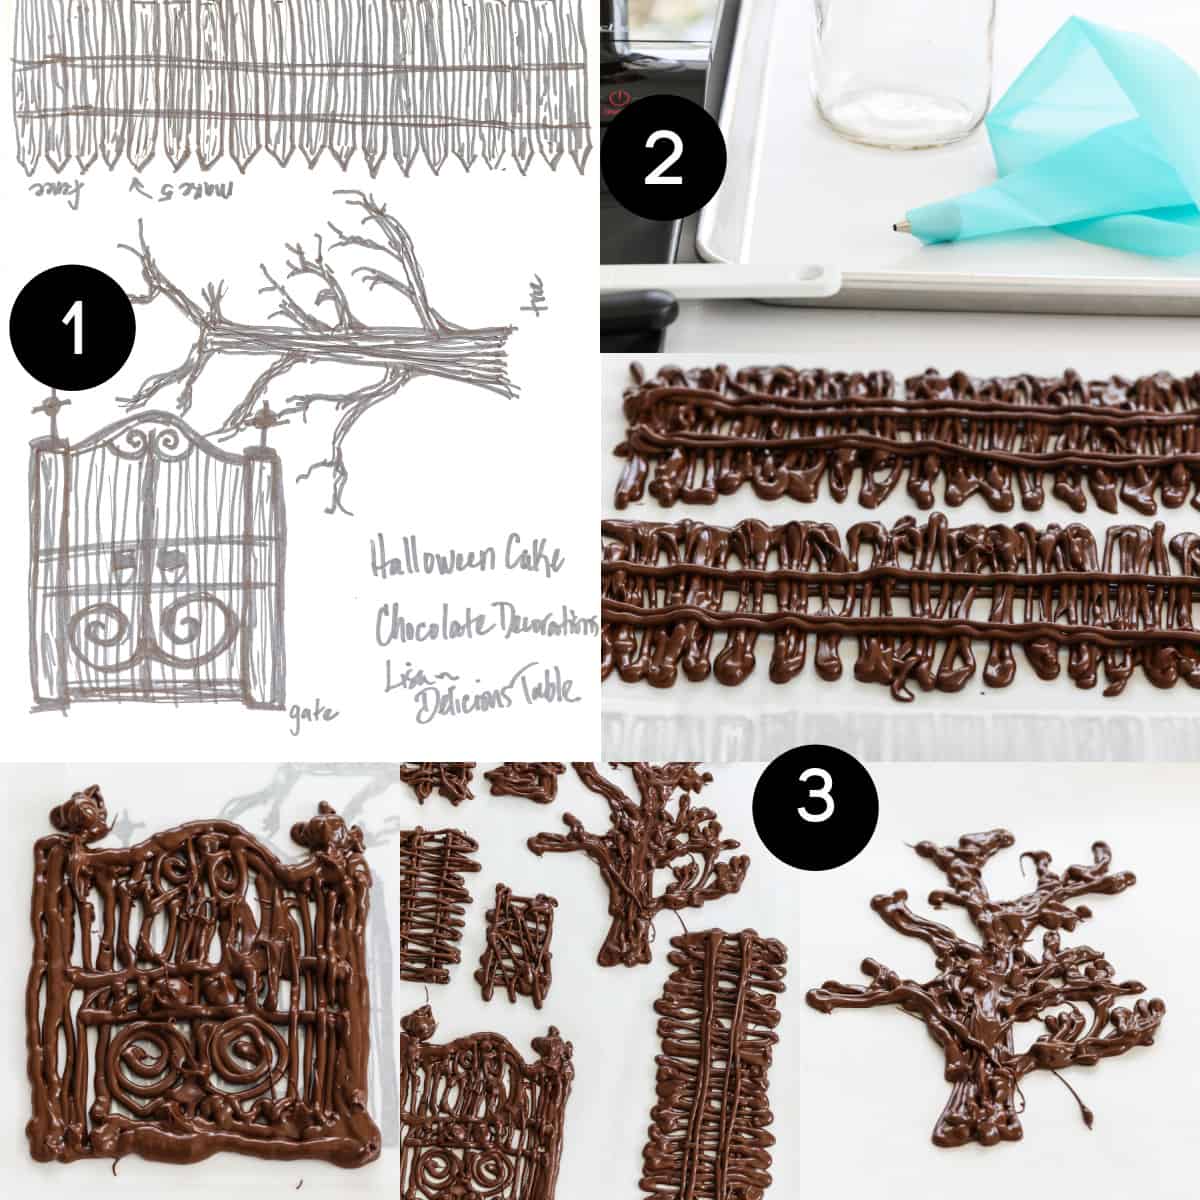
- Cut parchment paper to fit neatly inside a large baking sheet. Slide the free-downloadeable chocolate design template under the parchment paper.
- Load into a pastry bag fitted with a small round piping tip. I used a Wilton size 5 tip. Use a large jar to help fill the bag with melted chocolate.
- Quickly pipe the graveyard fence, gate, and tree onto parchment paper using the design I provided to guide you or create your own! PRO TIP: Pipe the chocolate fairly thick, going over the lines. Thin lines will break and snap more easily as you decorate. Let the chocolate pieces chill in the fridge to set on the tray, they are fine to chill overnight too.
Decorating Your Cake
- Crush Oreos for "dirt" in a small zip-top bag. First pop out the tombstones and bones from the mold. Place those on the cake with Oreo "dirt". Next, add the tree. Now add some chocolate buttercream to the lower part of the fences, and gate, this acts as "glue" to hold them to the side. Place those pieces around the outside edge.
- The cake will hold well overnight in the refrigerator for 1 day, and possibly 2 days. I would decorate it either the day of your party or the night before.
- The chocolate pieces can melt a bit on a hot day. I recommend you chill it until serving time!
Halloween Cake FAQ
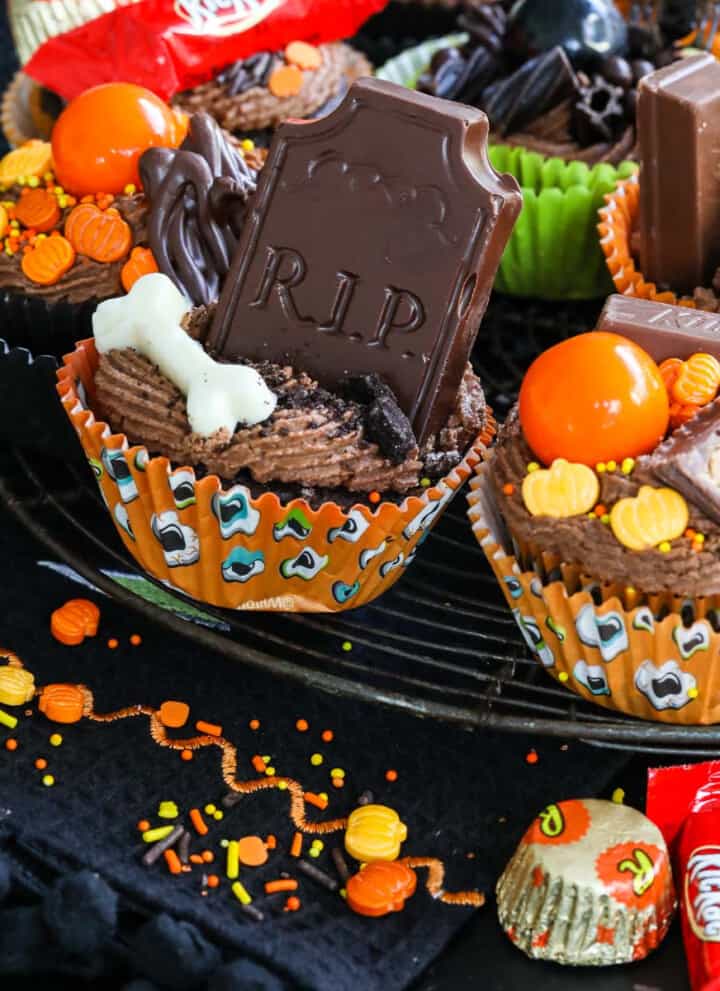
Decorate in any fun way you want, there are so many creative edible topper ideas. You can also use these on my Halloween Cupcakes, they are so cute!
-Make a candy spiders cake complete with black licorice spider webs
-Use edible ink pens to write RIP on store-bought cookies for tombstones
-Decorate with Halloween candies like Snickers and peanut butter cups!
-Colorful cake pops would be adorable on top or
smaller balls of hard candy
-Stick big gumballs in Fall colors for October birthdays
make some little meringue ghosts
-Add candy spooky eyes, these are the perfect topper!
bake a vanilla or pumpkin cakes instead of chocolate
-Use a dark chocolate cake and peanut butter filling or frosting
add a cream cheese frosting
-Add black dye to bake a dark black chocolate cake
-Try some Halloween themed cookie cutters and bake cookies to put on top, and have the kids decorate them with edible ink pens!
-Make a s'more cake with toasted melted marshmallows, graham cracker crumbs, and pieces of chocolate bars.
The options are endless, from a spider web cake to a ghost cake, or a Charlie Brown great pumpkin cake! You can bake a candy corn cake or a monster mash version that looks like Frankenstein.
- For easy Halloween cakes, bake or buy a sheet cake, and decorate with Brach's candy corn or pumpkin Mellocreme candies or make a pumpkin patch with Oreo cookie dirt!
Free Halloween Party Planner!
Download your FREE planner and get those party plans started today…
More Halloween Party Food Ideas
Boo! And Trick Or Treat... Halloween parties are all about serving haunted and creepy food, drinks, and Halloween treats.
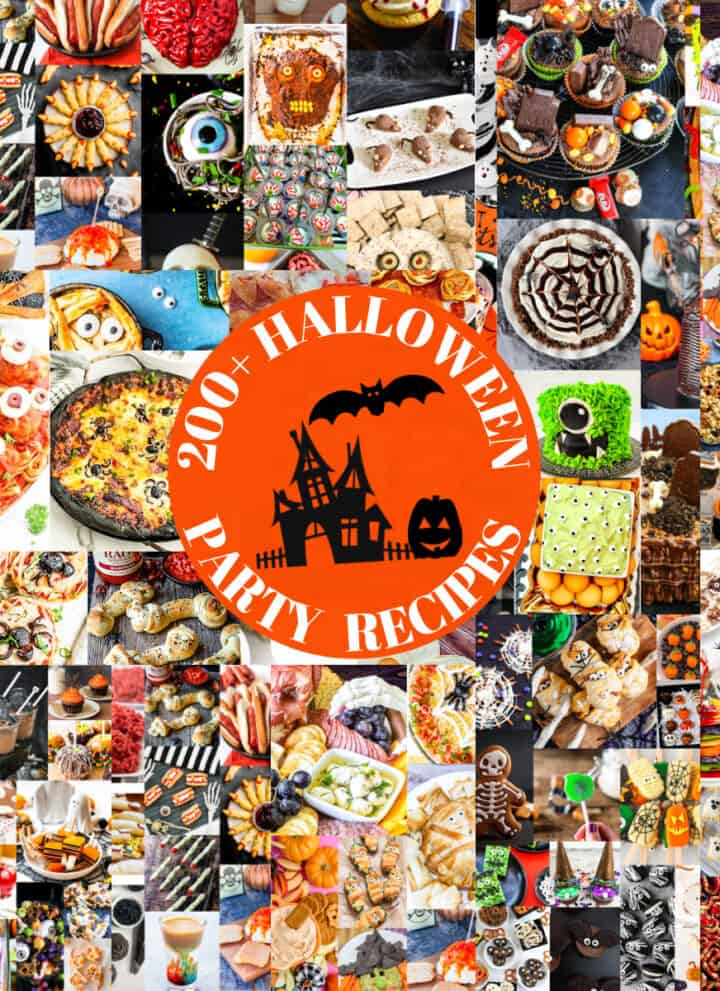
Boo! Take a peek through 200+ of the best Halloween Party Food Ideas from inspiring Food Blogger friends! Halloween parties are all about serving delicious recipes and creepy drinks
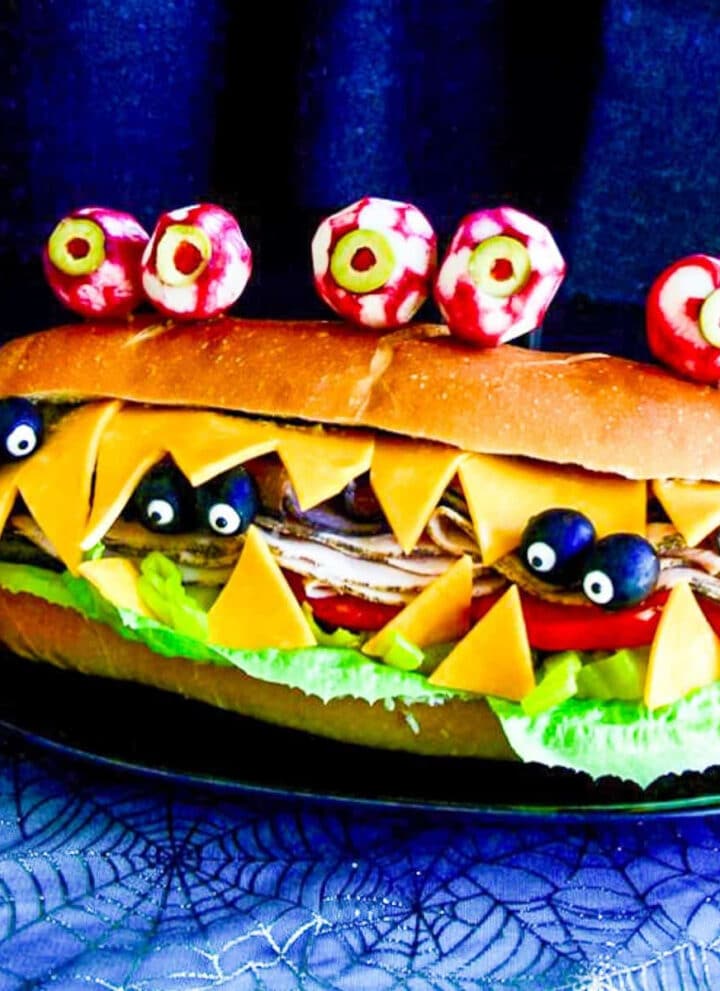
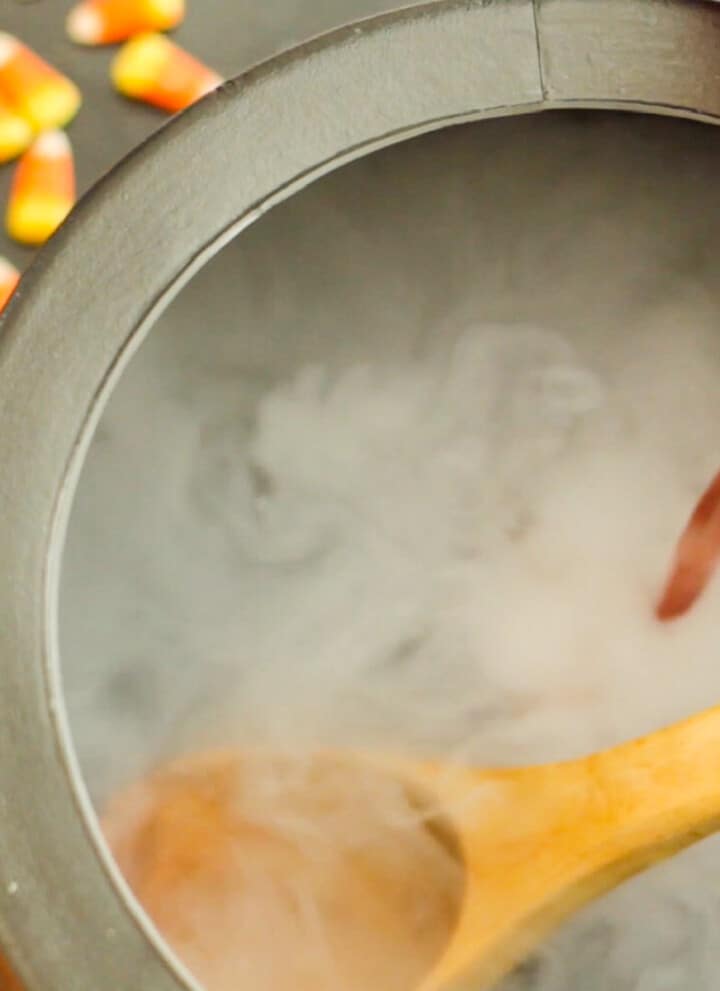
Take a look at all of my Halloween Recipes, I have lots of ideas to make your party spectacular. Halloween party food for a crowd is easy, serve a giant Halloween Sub Sandwich with edible eyeballs! You can add any deli meat, sliced cheese, or toppings you like. Plenty of ways to make this sub your way. Serve bubbly, creepy, Halloween Punch in a cauldron to a crowd with both adult and kid options, plus dry ice tips.
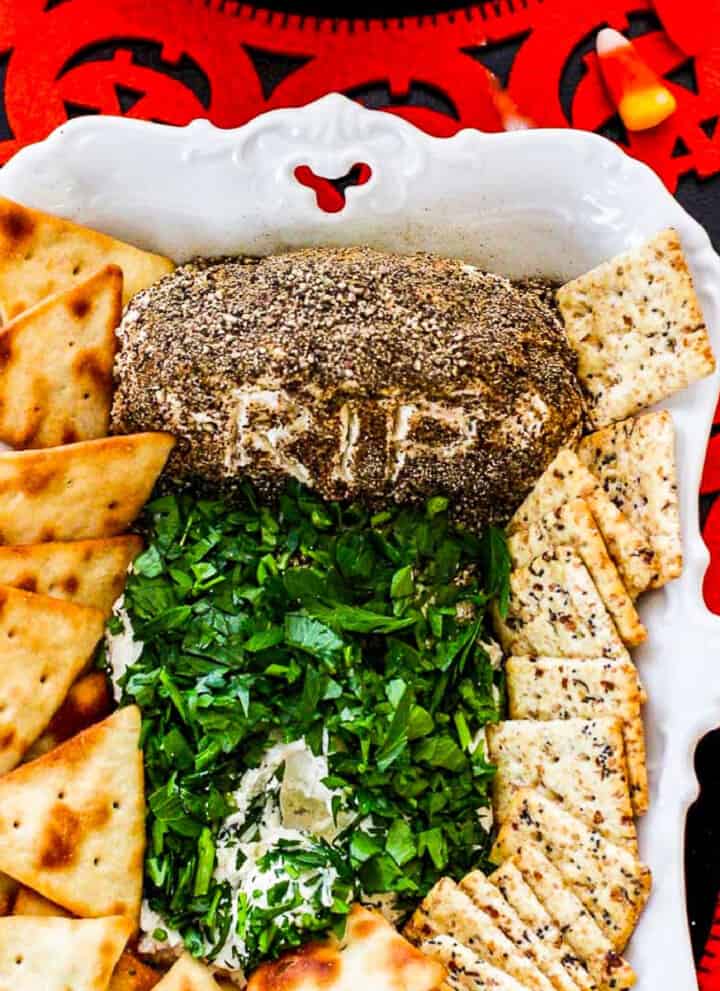
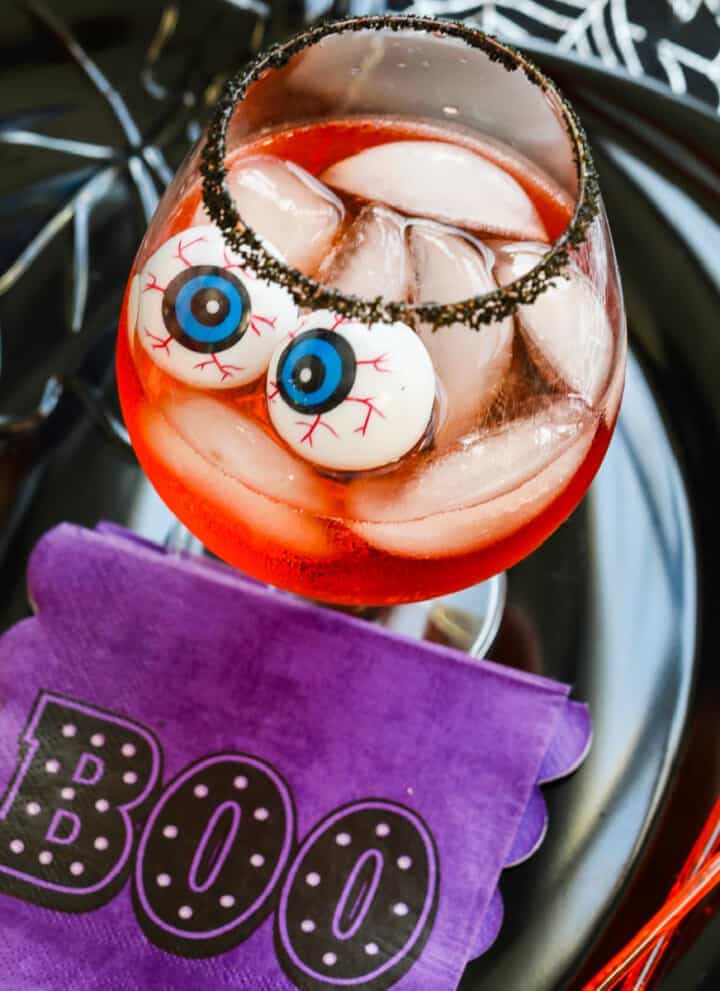
Peppered Tombstone Cracker Spread is a fun party dip and the perfect potluck appetizer to take to a friend's house. And sip on these spooky Aperol Cocktails.
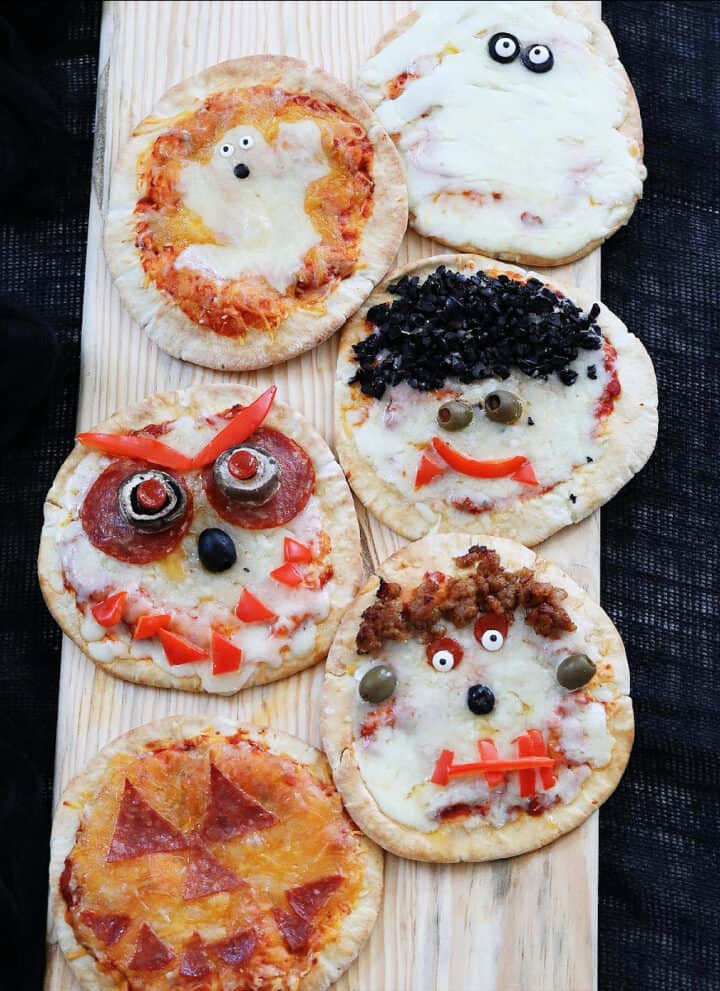
Halloween Pizzas are decorated with one of the six ideas here, choose a Jack-O-Lantern, Dracula, Frankenstein, Monster, Mummy, or Ghost!
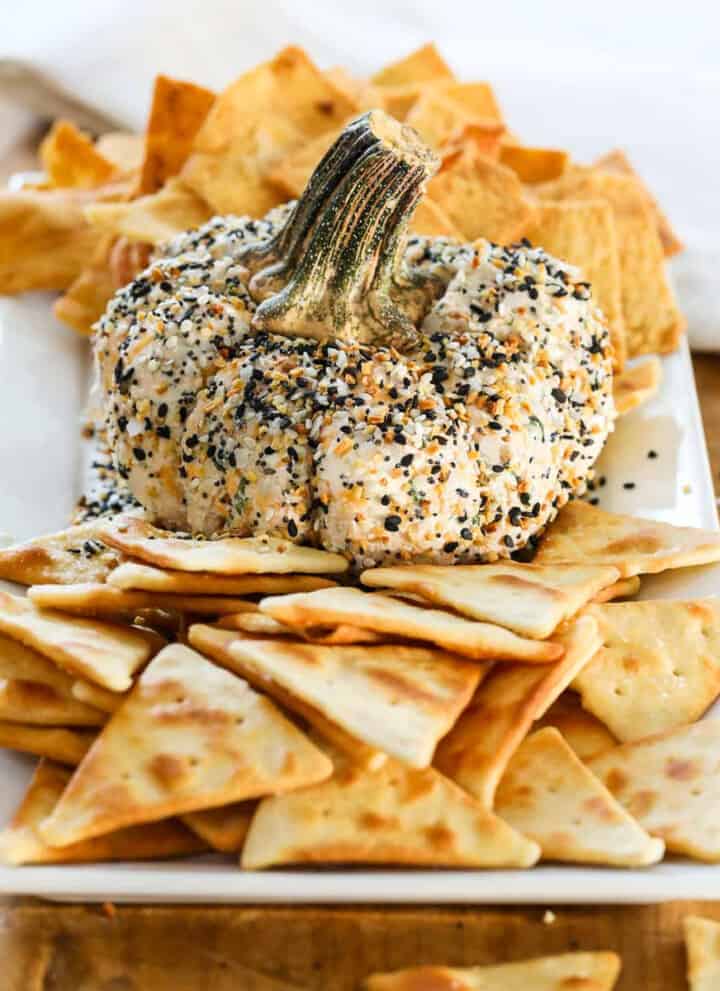
Have a pumpkin-shaped Cheese Ball with some pita chips, so fun for Fall parties.
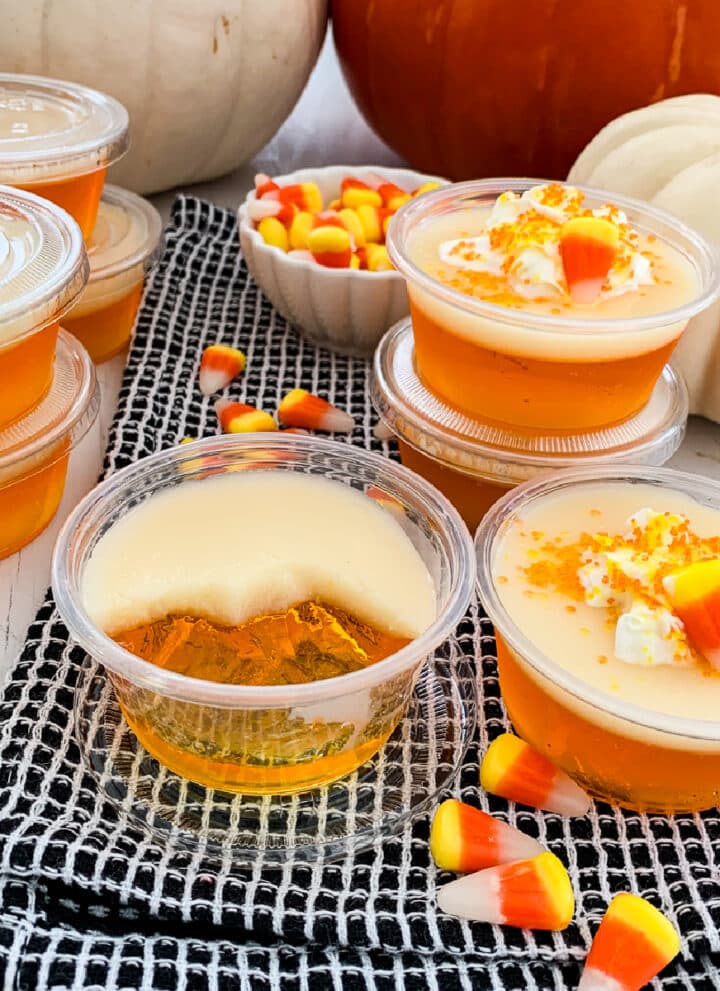
Candy Corn Jello Shots have 3 colors in these boozy adult shooters, just like the famous seasonal Fall candy! Batches of jello shots are known as a college party classic. But who doesn't love a layered shot that actually tastes great for a bit of mischief-making? Decorate with whipped cream and candy corn pieces for your Fall gathering or Halloween party. Cheers...
More Halloween Dessert Recipes
For the easiest Snack Halloween Treats, make these easy snacks on a board, and just add some candy for an adorable display. Halloween Bark is easy to make loaded with candy corn, sprinkles, and candy eyes.
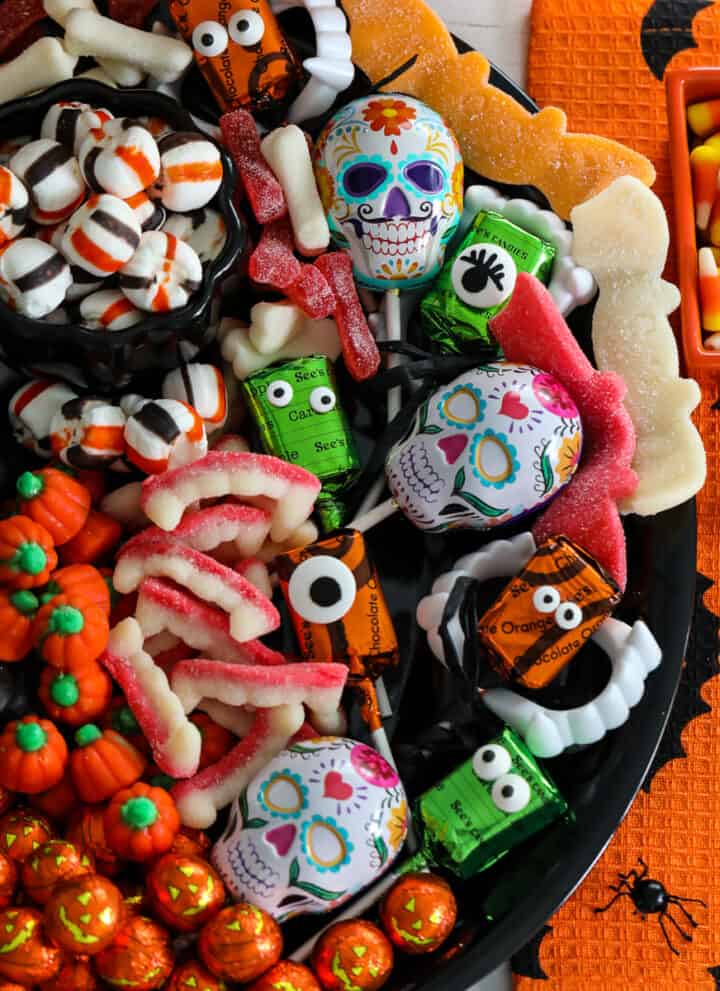
Make a Halloween Candy Board filled with whimsical classic treats, chocolate candies, lollipops, and slightly gross gummy sweets.
Halloween Cupcakes are topped with all kinds of edible cupcake toppers and candies!
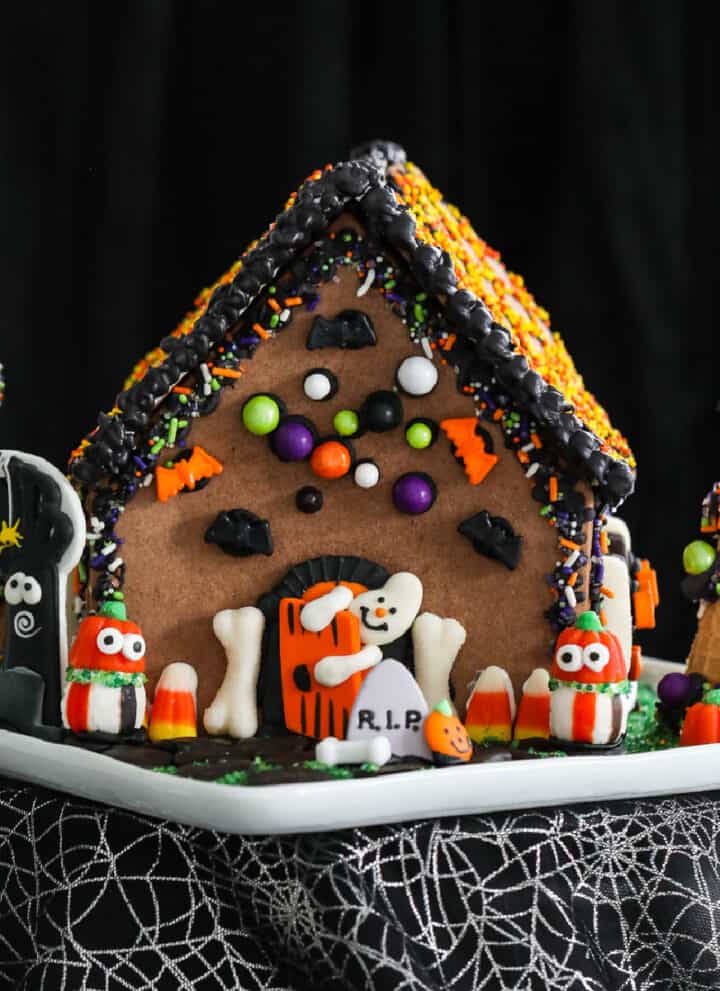
Decorate a spooky cute Halloween Gingerbread House with an easy-to-find premade kit. Use all kinds of candies in different ways, add your own creative details, and try new design ideas with leftover Halloween candy and royal icing.
Make a Caramel Apple Dip with crisp green apples, salted caramel sauce, and crushed Health bars. A beloved recipe for potlucks, holiday parties, Thanksgiving, Halloween, and all through the Autumn apple season.


Did you love this recipe? We would love to hear from you! If you make this recipe and love it, give it a 5-star rating ⭐⭐⭐⭐⭐ with a comment. THANK YOU!! Follow Delicious Table with my free newsletter and share this recipe with your friends on Facebook, Pinterest, and Instagram.
Halloween Cake Recipe
Equipment
Ingredients
chocolate cake
- 1 boxed chocolate cake mix
- 1 boxed white cake mix
- 6 eggs (eggs called for on the box)
- 1 cup vegetable oil (vegetable oil called for on the box)
- 2 ¼ cups water (water called for on the box)
- orange food color or gel
chocolate frosting
- 2 cups salted butter - room temperature (4 sticks)
- 1 cup vegetable shortening
- 10 cups powder sugar (confectioners sugar)
- 1 cup unsweetened cocoa powder
- 4-6 tablespoons hot water
- 2 tablespoon vanilla extract
- ½ teaspoon almond extract (optional but great!)
chocolate graveyard decorations
- 24 ounces semi sweet chocolate chips 24 ounce bag
- 1 teaspoon vegetable oil
- 1 bag white candy wafers
Instructions
chocolate cake
- Spray the bottom of your pan with non-stick spray. Next, line with parchment paper cut to fit the bottom of the pan. This will help release the cake from the pan and makes clean up much easier.
- Mix your batter in a large bowl or stand mixer according to the box directions. Deeper pans might need more batter - I used a deeper pan, 3 inches deep, so I mixed up 2 boxes of cake mix batter. Most pans are 2 inches deep.
- In a small bowl place 2 cups of batter, stir in orange food color until it’s the orange you like. Now, pour dollops of the batter into the pan alternating from chocolate and orange. Try to place the batter on top of each area, it will begin to spread out.
- When all the batter is in the pan, use a skewer to pull lines from the center outward, and then do some slight swirls around the pan. This helps create the marble design. Rap the pan down on the counter to help level the batter and pop any bubbles in the batter that might cause uneven baking.
- Bake according to your box directions, most classic mixes require a 350-degree oven for 28 minutes for a regular 9 x 13 pan. (If you use a pan deeper than 2 inches, reduce baking temperature to 325 degrees and bake longer for 55 minutes). Check with a toothpick, if it comes out clean the cake is done.
chocolate frosting
- Beat soft butter and shortening in a mixer on high until creamy for 5 minutes.
- At low speed, add 10 cups powder sugar 1 cup at a time until smooth.
- Add 1 cup cocoa powder, mix well.
- On high speed, mix in vanilla, almond extract, and hot water for 5 minutes until fluffy and smooth. Add more hot water if necessary until frosting is smooth.
frost cake
- Cool for 10 minutes in the pan, then remove it to a wire rack to finish cooling. Cool the cake in the refrigerator for at least two hours or preferably overnight before decorating. I like to bake one day, then decorate the next. This helps release the steam and the frosting holds on when chilled.
- Place a dollop of chocolate frosting on a small piece of cardboard (cut to fit the cake) on a tray, or cutting board and set the cake on top. This keeps it from sliding around while decorating.
- Frost using a small offset spatula. Smooth out the frosting as best you can all over the top and sides. Chill it in the refrigerator while you make the chocolate decorations.
Make Chocolate Decorations: Tombstones, Bones, Fence, Gate, and Tree
- Cut parchment paper to fit neatly inside a large baking sheet. Slide the downloadable chocolate design template under the parchment paper.
- Melt the chocolate for decorating. In a double boiler, add chocolate chips and a teaspoon of vegetable oil, and stir until melted over simmering not boiling water. IMPORTANT: don't splash water into the melting chocolate, or it might seize "freeze" up. You might need to add a bit more vegetable oil to get it smooth. Load into a zip-top bag fitted with a small round piping tip. I used a Wilton size 5 tip.
- Quickly pipe the graveyard fence, gate and tree onto parchment paper using the design I provided to guide you, or create your own! PRO TIP: Pipe the chocolate fairly thick, going over the lines. Thin lines will break and snap more easily as you decorate. Let the chocolate pieces chill in the fridge to set, they are fine to chill overnight too. Use a candy mold and fill the tombstones with melted chocolate, and the bones with white candy melts, let set until firm in the fridge.
Assemble Graveyard Halloween Cake
- Crush Oreos for "dirt" in a small zip-top bag. First pop out the tombstones and bones from the mold. Place those on the cake with Oreo "dirt". Next, add the tree. You might want to pipe some frosting at the base of the tree to hold it up. Now add some chocolate buttercream on the lower part of the fences, and gate, this acts as "glue" to hold them to the sides. Place those pieces around the outside edges, and break off smaller pieces of fence if you need them.
- The cake will hold well overnight in the refrigerator for 1 day, and possibly 2 days. I would decorate either the day of your party or the night before. I have also had guests decorate it during the party which was SO much fun!
- NOTE: The chocolate pieces will melt a bit on a hot day. I recommend you keep the cake chilled until serving time!


What an amazing cake for Halloween! Simple to make with a cake mix and the most adorable decorations!
Thank you so much, Anne. The chocolate work looks intimidating, but it really is easy, just squeeze chocolate over the template!
What a cake for Halloween, the decorations were so easy and make the cake!